Onboarding for GoHighLevel: Master Higher Client Retention
Onboarding for GoHighLevel is not just a checklist. It is your first handshake with a client. It sets the tone, builds trust, and ensures your service delivers value from day one.
Well, this is quite understandable – when clients see progress early, they stay longer. But without guidance, clients may feel lost. Onboarding helps them start strong.
In this article, you will learn about why onboarding for Gohighlevel is crucial and how you can set the things up for your clients.
Key Takeaways
What is Onboarding for GoHighLevel?
Onboarding for GoHighLevel means setting up a new client’s account inside the platform. And it enables your clients to benefit from your services immediately.
It covers everything from account creation to automation setup. Think of it as your digital welcome mat. When done right, onboarding creates clarity, trust and loyalty among your client.
Why Do Onboarding for GoHighLevel?
You already know GoHighLevel can automate nearly anything. But without onboarding, none of it works right. Here is why onboarding is essential:
Increases Client Retention
People quit what they do not understand. Onboarding solves that by showing clear value from the start.
Prevents Confusion
Clients don’t need to guess how things work. You walk them through it. Fewer questions. Less stress.
Builds Trust
From day one, you’re showing up with a plan. That matters. It positions you as a professional.
Saves Time
Once your onboarding is systemized, it runs like a machine. Clients move faster. You get fewer support requests.
Read this: How to Set Up Your GoHighLevel Account?
Data Required for Onboarding
Before anything gets built, you need data. Use a funnel or form in GoHighLevel to collect this info all at once.
Here is the checklist for required information:
Pro Tip
Automate this step. Embed a form in your funnel or landing page. That way, every lead gives you what you need before you begin.
Now, Create the Sub-account for Client
Once you have the data, it is time to create their space inside GoHighLevel. Here’s how.
Agency SaaS Pro Users
Manual Setup (Starter/Unlimited Plans)
No matter which option you use, always double-check the admin access and plan settings.
Standard Onboarding for GoHighLevel the Easy Way
Now the real work begins. You have got the account. Now make it work for the client.
Import Contacts
Request a CSV file of all their customers. Upload to the CRM. This populates their database instantly.
Connect Domain
Is their site moving to GoHighLevel? If yes, transfer the domain. If no, ask them to provide admin access to the current site.
You will need this to add chat widgets, forms, calendars, and review tools.
Ads Access
Are you managing their ads? Get Facebook and Google Ads Manager access. Add your team as admin. Sync ad tracking inside GoHighLevel.
Website Setup
Building their site from scratch? Request or create a logo. Write clean, conversion-focused copy. Use a GoHighLevel funnel or website builder.
Calendars and Scheduling
Get availability times from the client. Then:
Employee Accounts
Each team member needs access. Create users for employees. Assign roles: Admin, Manager, Staff. Set permissions for each.
Phone Setup + A2P
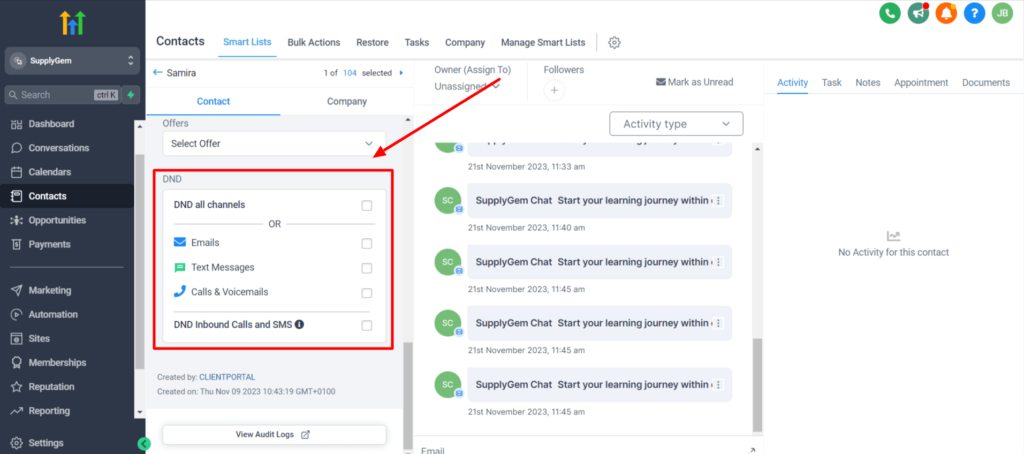
Create a HighLevel number for the account. Register for A2P 10DLC (US clients). Assign number to workflows and campaigns. Test SMS delivery.
Integrations
Connect the client Google Business Profile, Facebook and Instagram account. This enables automated reviews, posting, and lead tracking.
Payment Processing
Are you collecting payments for them? Connect Stripe or PayPal.. Test a payment link. Add products to the funnel or invoice tool.
Did not sign up yet? Take full advantage of the 30-day free trial. Set up workflows, automate emails, and test the client onboarding process. The more you engage with it, the better you will understand the process.
Read this: Gohighlevel for Photography with Free Template + $10K Bonus and Free Consultation
How to Do Gohighlevel Onboarding with Snapshot?
Snapshots are pre-built templates that package your funnels, workflows, calendars, and settings. They let you clone an entire setup and apply it to a new sub-account in seconds.
Snapshots save hours of manual setup. You create once, then reuse for every client. It ensures consistency and speeds up delivery.
Build Your Master Snapshot
Start by creating a complete setup inside a test sub-account. Include:
Once done, go to the Agency View and save this as a Snapshot.
Apply the Snapshot to New Sub-Account
When onboarding a new client:
Everything gets copied—no need to rebuild.
Customize the Snapshot for the Client
After loading the Snapshot:
Make sure the content feels personal and relevant.
Test Everything Before Launch
Walk through the client account as if you were the end user. Test:
Fix anything that is generic or broken.
Train the Client on Their Setup
Give a quick walkthrough of what is inside their account. Show:
Pro Tip
Create simple Loom videos to guide clients through their new system. This can save you time and reduce support requests.
Final Pre-Launch Onboarding Checks Before Handoff
Even with Snapshots and workflows in place, do not Skip these final checks. They make the difference between good and great onboarding.
Configure Email Sending Domains
Set up a custom SMTP or connect Mailgun. Verify DNS records for proper email delivery. Or, the emails may end up in spam folder.
Activate Notifications for Leads and Reviews
Clients need to know when leads, bookings, or reviews happen. Set up SMS or email alerts in workflows.
Test the Mobile Experience
Most users interact on mobile. Preview funnels, calendars, and widgets on a phone to catch layout issues.
Assign Proper User Roles
Give team members only the access they need. Set roles like Admin, Sales, or Support to protect client data.
Add Analytics and Tracking Tools
Install tracking pixels or Google Tag Manager. This lets you track conversions, run ads, and measure funnel performance.
Ready to Get Started with Onboarding?
The best way to experience HighLevel powerful onboarding features is to get hands-on. Unlock your 30-day free trial today and see how easy it is to onboard clients and automate workflows.
Got questions to ask? Book a 30-minute free consultation with one of GHL experts. They will explain the things in further detail and address your queries.