How to Style Your GoHighLevel Login Page with Custom CSS
Personalizing your GHL login page using custom CSS enhances your brand’s professional look. By injecting specific code into the platform settings, users can change backgrounds, button styles, and fonts. This level of customization is crucial for marketers who want to provide a seamless client experience within their white-labeled app.
Why Customize Your GoHighLevel Login Page?
First impressions matter, and your login page is often the first interaction clients have with your platform. By customizing it, you can:
- Reinforce your brand identity.
- Create a professional and trustworthy user experience.
- Stand out from competitors with a unique design.
Understand the Default Structure of the GoHighLevel Login Page with Custom CSS
Before diving into the design process, it’s crucial to understand the structure of the default GoHighLevel login page. Here’s how you can analyze it:
- Open your GoHighLevel login page in any modern browser.
- Right-click anywhere on the page and select Inspect or Inspect Element to access the developer tools.
- Examine the HTML and CSS structure. Identify key elements such as the form container, input fields, buttons, and background. Take note of the class names and IDs for these elements, as you’ll need them later.
Set Up Your Custom CSS File
Once you have a clear understanding of the login page structure, it’s time to create your custom CSS file.
- Open a text editor or code editor such as VS Code, Sublime Text, or Notepad++.
- Create a new file and name it
custom-login.css. - Save this file in a folder where you can easily access it for editing and future updates.
Write Your Custom CSS Code
Here’s a sample CSS code snippet you can use to transform your GoHighLevel login page. Feel free to tweak it to match your brand’s colors and style:
:root {
    --background-image-main: url("https://storage.googleapis.com/msgsndr/gO2kDjSoKxWFYhpo2dP8/media/67841dd899f61f5ff16ab336.png");
    /* The main background image for the login page. Applies to the entire viewport. */

    --background-image-body: url("https://storage.googleapis.com/msgsndr/gO2kDjSoKxWFYhpo2dP8/media/6784255e69da5fbed1234f27.png");
    /* The background image for the login box body. Adds a visual texture to the login form. */

    --logo-image: url("https://yt3.ggpht.com/NBy6YQUJhcgLl9O4Yon6ly3kB7xiUfig5SYxV7NECXBp0fDhyk8V2bjElCwUrPLMIX6zf-MY1Q=s48-c-k-c0x00ffffff-no-rj");
    /* The logo image displayed above the login form heading. Typically, a company or brand logo. */

    /* Primary and Secondary Colors */
    --primary-color: #00FFFF;
    /* Primary accent color used for highlights, hover effects, and focus indicators. */

    --secondary-color: #50e6a7;
    /* Secondary accent color for buttons and other prominent elements. */

    --text-color: #ffffff;
    /* The main text color used throughout the login page for headings, labels, and other text content. */

    /* Input Field Styles */
    --input-bg-color: #ffffff;
    /* Background color for input fields, ensuring readability and contrast. */

    --input-border-color: #bdbdbd;
    /* Border color for input fields, providing a subtle boundary around inputs. */

    /* Effects and Opacity */
    --blur-effect: blur(20px);
    /* The blur effect applied to the background of the login box for a frosted glass effect. */

    --card-bg-opacity: rgba(255, 255, 255, 0.08);
    /* Background color with opacity for the login box's border. Helps blend the design. */

    /* Interactive States */
    --hover-color: #00FFFF;
    /* The color applied to buttons and other elements when hovered over. Matches the primary color. */

    /* Font Sizes */
    --font-size-sm: 0.875rem;
    /* Font size for smaller text elements, such as input placeholders and labels. */

    --font-size-lg: 21px;
    /* Font size for larger text elements, such as headings. */

    /* Dimensions */
    --border-radius: 11px;
    /* Border radius for rounded corners on elements like the login box and buttons. */

    --button-min-height: 55px;
    /* Minimum height for buttons to ensure consistency and improve usability. */
}


/* Background Styles */
.hl_login {
    background-image: var(--background-image-main) !important;
    background-position: center bottom;
    background-size: cover;
    background-repeat: no-repeat;
    display: flex !important;
    flex-direction: column !important;
    justify-content: center !important;
    align-items: center !important;
    margin: 0 auto !important;
    padding: 0 !important;
    height: 100vh;
}

/* Header Hiding */
.hl_login--header {
    display: none !important;
}

/* Login Box Body */
div.hl_login--body {
    max-width: 450px !important;
    width: 100% !important;
    background: var(--background-image-body) !important;
    background-position: top right !important;
    background-size: cover !important;
    background-repeat: no-repeat !important;
    border-radius: var(--border-radius) !important;
    backdrop-filter: var(--blur-effect);
    border-style: solid;
    border-width: 1px;
    border-color: var(--card-bg-opacity);
    animation: zoomInAnimation 0.6s ease-in-out;
}

/* Responsive Design */
@media only screen and (max-width: 1000px) {
    div.hl_login--body {
        margin: 0 !important;
    }
    .hl_login {
        background-position: center left;
    }
}

/* Zoom-In Animation */
@keyframes zoomInAnimation {
    0% {
        transform: scale(0.5);
        opacity: 0;
    }
    100% {
        transform: scale(1);
        opacity: 1;
    }
}

/* Card Styles */
.hl_login--body .card {
    background-color: transparent !important;
}
.hl_login--body .card .card-body {
    padding: 50px 20px;
    background-color: transparent;
}

/* Input Fields */
.hl_login .hl_login--body .form-control {
    background: var(--input-bg-color) !important;
    font-size: var(--font-size-sm);
    color: #2a3135;
    border: 1px solid var(--input-border-color) !important;
    border-radius: 5px !important;
    padding: 10px;
}

/* Logo Styles */
.hl_login--body .heading2::before {
    content: "" !important;
    background: var(--logo-image) !important;
    background-position: center !important;
    background-repeat: no-repeat !important;
    background-size: contain !important;
    height: 40px !important;
    width: 40px !important;
    margin-bottom: 10px;
    display: block !important;
    border-radius: 100% !important;
}

/* Text Styles */
.hl_login--body .heading2 {
    margin-bottom: 10px;
    font-weight: 700;
    text-transform: capitalize;
    text-align: left;
    font-size: var(--font-size-lg);
}

/* Button Styles */
.hl_login .btn.btn-blue,
.hl_login .btn.btn-blue:active,
.hl_login .btn.btn-blue:focus {
    background-color: var(--secondary-color);
    border-color: var(--secondary-color);
    color: var(--text-color);
    transition: background-color 0.3s ease-in-out;
}
.hl_login .btn.btn-blue:hover {
    background-color: var(--hover-color);
    border-color: var(--hover-color);
    color: var(--text-color);
}
.hl_login button {
    background-color: var(--text-color);
    color: #000000;
    min-height: var(--button-min-height);
}
.hl_login button:hover {
    background-color: var(--hover-color) !important;
}

/* Additional Text Colors */
.hl_login--body .card-body .login-card-heading h2,
.hl_login--body .card-body .flex span {
    color: var(--text-color);
}
#forgot_passowrd_btn,
.card-body .foot-note .font-semibold,
.hl_login--body .card-body .font-semibold.cursor-pointer.text-curious-blue-500 {
    color: var(--primary-color);
}

/* Inputs */
.hl_login--body input[type="radio"] {
    color: var(--primary-color);
}
.hl_login--body input.hl-text-input {
    background: rgba(0, 0, 0, 0.36) !important;
    color: var(--text-color) !important;
    border: 0.5px solid var(--card-bg-opacity) !important;
    border-radius: 7px !important;
}

/* Focus Styles */
.hl_login--body .card-body div .focus\:outline-none {
    background-image: var(--hover-color);
    border-style: none;
    border-radius: 500px !important;
    color: #020202;
    font-size: 16px;
}

/* Paragraph Text Styles */
.hl_login--body .card .card-body p {
    color: var(--text-color);
}
Step 4: Apply the CSS to Your GoHighLevel Login Page
Now that your CSS file is ready, it’s time to apply it to your GoHighLevel account. Follow these steps:
- Log in to your GoHighLevel dashboard.
- Navigate to Agency Settings > Custom CSS.
- Copy the CSS code from your
custom-login.cssfile and paste it into the Custom CSS field in GoHighLevel. - Save your changes.
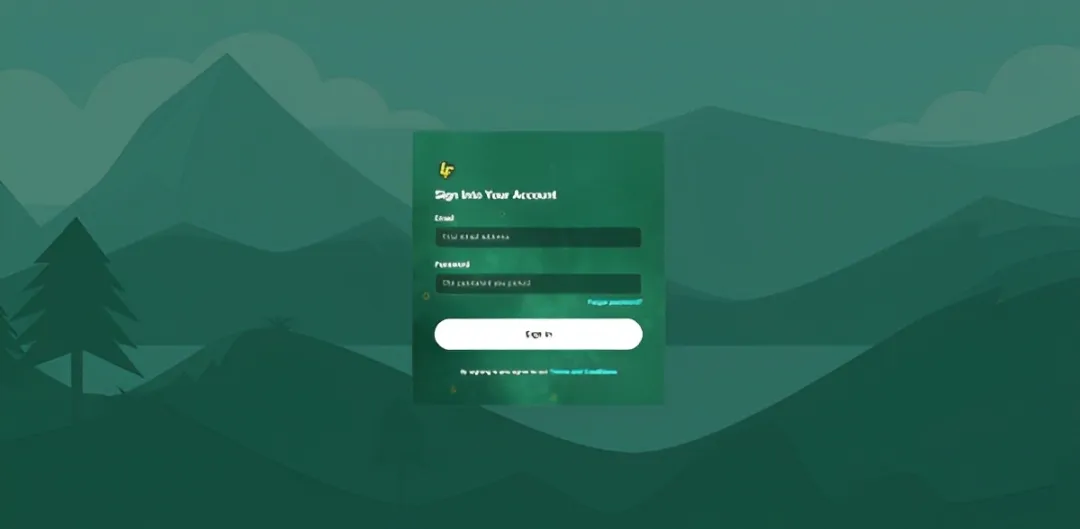
Step 5: Preview Your New Login Page
After applying the custom CSS, visit your login page to see the changes in action. Check the following:
- Does the design align with your brand?
- Are all elements (inputs, buttons, logo) styled correctly?
- Is the page responsive on both desktop and mobile devices?
Step 6: Fine-Tune and Optimize
If you notice areas for improvement, revisit your CSS file and make the necessary adjustments. Use your browser’s developer tools to test changes in real-time before saving them in GoHighLevel.
Bonus Tips for a Professional Login Page
- Add Animations: Use CSS animations to add subtle hover effects or transitions for a modern touch.
- Use Custom Fonts: Import Google Fonts to give your login page a unique and professional look.
- Ensure Accessibility: Make sure your design is accessible to all users by using readable font sizes, high contrast colors, and proper labels for input fields.
Conclusion
A custom GoHighLevel login page is more than just a visual upgrade; it’s an opportunity to showcase your brand’s professionalism and attention to detail. With the step-by-step guide and CSS code provided in this post, you can create a login page that not only looks great but also leaves a lasting impression on your clients. Start designing today and take your GoHighLevel experience to the next level!
Have questions or need more design tips? Drop a comment below, and we’ll be happy to help!